SearchFit Quick Start Guide
- Before You Get Started
- Add the Core Set of Style Sheets & Templates
- Adjust Search Engine Optimization Settings
- Create Custom Pages
- Create Your Product Catalog
- Add Shipping Methods & Details
- Add Credit Card Processors and Other Payment Methods
- Configure Taxes Settings
- Configure Currency Settings
- View and Process Your Orders
1. Before You Get Started
- The majority of updates or changes that you make using the shopping cart Control Panel will not be visible your website until you Generate your site. To Generate, click the Generate button located in the Control Panel at the upper left, just beneath the system logo (
 ).
).
- You cannot use FTP with this system. All product images are uploaded using the Products Screen. All other images & files can be added to the Website File Storage or Dynamic File Storage screen.
2. Add the Core Set of Style Sheets & Templates
There are many types of templates available; however, the Main Template, Main CSS, Product Template, Checkout Template and Checkout CSS are the core set of templates and style sheets needed to get your store running.
Style Sheets
The style sheets accepted by the system are CSS documents. Each is automatically populated with a default set of rules. You may modify the default style sheets, or you may delete them and make your own.
The Main CSS is automatically applied to your Main Template and Product Template. The correct path to use for background-image rules on the Main CSS is: background-image: url(../images_templ/...
To locate the Main CSS:
- Click the Design tab.

- Locate the CSS (Cascading Style Sheet) section. Click the Main CSS icon (
 ). You will be transferred to the Main CSS screen.
- You will see the Main CSS located within the Common Website Main CSS field.
The Checkout CSS is automatically applied to your Checkout Template. The correct path to use for background-image rules on the Main CSS is: background-image: url(../../images_templ/...
To Locate the Checkout CSS:
- Click the Design tab.
- Locate the CSS (Cascading Style Sheet) section. Click the Checkout CSS icon (
 ). You will be transferred to the Checkout CSS screen.
- You will see the Checkout CSS located within the Checkout CSS field.
Templates
All of your template images including CSS background images should be stored using the Website File Storage screen and can be accessed using the path: <img src=images_templ/...>. It's easy and fast to upload multiple files by uploading a compressed file containing all the desired images.
To store images using the Website File Storage screen:
- Click the Content tab.

- Locate the Files (Images, Audio, Video, Documents, and so on) section.
- Click the Website File Storage icon (
 ). You will be transferred to the Website File Storage screen.
- Click the New File link. The New File panel will appear.
- Select the desired destination folder and click the Continue button (
 ). You will be transferred to the Website File Storage Upload form.
- If you would like to upload a file stored on your computer and depending on the type of file you would like to upload, click the Browse button next to the Local File or Local Files (ZIP file) field. If you would like to upload a file that is stored on a remote URL, then enter the URL of the file into the Remote File field.
- The File Name field should populate automatically. Check to make sure it contains the correct document name.
- When finished, click the Upload button (
 ). If you used the field labeled Local Files (Zip file) to specify the image(s) location, then the Control Panel will automatically decompress the image files and display a list of the image names.
- Repeat steps 4-8 to upload the desired images.
The Main Template uses the Main CSS and controls the layout of the area surrounding the content of your pages. The Main Template, and all other templates, are created using mostly HTML with some added system-specific keywords.
To locate the Main Template:
- Click the Design tab.
- Locates the Templates section. Click the Main Template icon (
 ). You will be transferred to the Main Template screen.
- You will see the Main Template located within the Common Website Main Template field.
An Example Main Template
The Product Template uses the Main CSS and determines the layout of your Products as they appear on your Category, Sub Category, and Detailed Product Pages and more. Product Templates are highly customizable and consist of many different fields including:
- Brief Template (Category Pages): Determines the layout of lists of products as they appear on your Category or Sub Category pages.
- Brief Template (Brief Product Page): Determines the layout of Brief Product displays, which are an optional, alternate set of Detailed Product pages.
- Detail Template: Determines the layout of Detailed Product pages.
- Group Header & Footer Templates: Used in combination with the Brief Template (Category pages). Allows you to add a container element like a table or unordered list that surrounds all products.
- Separator Header & Footer Template: Applied to a special type of product called Separator Products, which are used to split your Category pages into sections. The Separator Header & Footer Template combines to create a wrapper around the Separator Product, which is usually HTML text showing name of a Category page section.
To locate the Product Template:
- Click the Design tab.
- Locate the Templates section. Click the Template Storage icon (
 ). You will be transferred to the Template Storage screen.
- On the Template Storage screen, select Products from the select box labeled Show all Templates for. The Template Storage table will appear.
- Click the New Template link. The New Template panel will appear.
- Select Website: Products as the Template Type. Enter the desired template name. This name is for your information only and will not be visible to customers.
- When finished, click the Continue button ( ). You will be transferred to the Edit Product Template form. This is the area that you will be able to enter the HTML & keywords (as described in the Product Template list above).
An Example Detailed Product Template
The Checkout Templates use the Checkout CSS and control the layout of the area surrounding your Checkout pages and others including:
- Member Account Pages
- Wish List Pages
- Check Order Status Page
- Download eProduct Page
- Check Gift Card Balance Page
Special tags are available (and listed in the help files) which allow you to place content per each of the page types that use the Checkout Templates.
There are two Checkout Templates:
- Top Checkout Template: Controls the layout of all content on the Checkout pages that appears before the page content (ex = Checkout Form).
- Bottom Checkout Template: Controls the layout of content on the Checkout pages that appears after the page content.
To Locate the Checkout Templates:
- Click the Design tab.
- Locate the Templates section. Click the Checkout Templates icon (
 ).
).
- Use the select box labeled Checkout Template Type to select and view either the Top Checkout Template or the Bottom Checkout Template.
An Example CheckOut Template
3. Adjust Search Engine Optimization Settings
SearchFit contains many settings related to SEO (Search Engine Optimization). Adjusting these settings may help you increase your search engine ranking. Caution should be used with these settings and you should not change/enable something that you do not understand. We offer Search Engine Optimization services to help you achieve top rankings for your targeted key phrases. Please contact us to find out how we can help increase your free, organic traffic from Search Engines.
SEO Naming Rules
The SEO Naming Rules screen allows you to create naming rules for many items throughout your site that affect Search Engine Optimization such as: Titles, Meta Tags, Link Text, Image Titles, Page Names and more. The SEO Naming Rules screen is located within the SEO Naming Rules Tab. Once configured, naming rules are automatically applied to existing and new products and categories to help ensure consistency. Although these settings affect the values of many items on your published website, they will not affect the values of items as displayed in the fields throughout the Control Panel. During the generation process items are modified according to the SEO naming rules. The benefit of this design is that the current value stored for a given field can be combined with the SEO naming rule in order to create a highly customizable value. For each available item & rule listed on the SEO Naming rules screen, you are able to select several attributes, delimiters, custom text and more for a highly customizable value.
An Example Naming Rule from The SEO Naming Rules Screen

How to Create a SEO Naming Rule
- Go to the SearchFit Control Panel SEO Naming Rules tab
 | SEO Naming Rules
  screen.
Note: You should only use this screen if you are familiar with SEO best practices. You do not need to enable & use all SEO Naming Rules, just the ones that make sense for your store. The most commonly create rules are for Products and Categories.
- Change the setting labeled Enable SEO Naming Rules for user [X] to Yes.
- The screen contains 10 sets of rules. There is one set of rules for each type of page on your SearchFit generated website. For example, there are rules for Category Types, Categories, Products, etc. Each set of rules can be made visible or hidden by clicking the Show/Hide link to the right of the rule name. Click the Show link next to the rule set that you would like to create/enable. In this example, we will be discussing the Products Naming Rules set. Once the Show link is clicked, the rule set will become visible.
- Click the checkbox on the left side of each rule that you would like to enable. After checking a given checkbox, the corresponding form inputs will become accessible. For example, if the checkbox corresponding to the Webpage Name rule is checked, the inputs to the right of the checkbox can then be accessed an modified. Click the Checkbox next to Webpage Name.
- Click the first select box in the Webpage Name rule. The select boxes allow you to specify items that will be used to construct your web page name. Many choices are available and the best choices vary per store and SEO strategy. Generally, you the choices you select should follow this pattern: item + delimiter + item + delimiter + item
For example, you could choose the following items (from 5 different select boxes): Product Name + Default Page Name Delimiter + Product Number + Default Page Name Delimiter + Manufacturer Name
Note that in order to add more than two fields, you must click the Add More Fields link.
- Continue making additional rules for the Products Naming Rules rule set.
- Create rules for the additional rule sets as desired.
- When finished, click the Update(
 ) button at the bottom of the screen.
SEO General Settings
SEO General Settings are a collection of settings that can be used to adjust factors related to Search Engine Optimization per user. Adjustments can be made to the html site map, site wide document names and more. The SEO General Settings screen is located within the SEO tab.
The SEO General Settings Screen

To adjust your SEO General Settings, Go to the SearchFit Control Panel SEO Naming Rules tab | SEO General Settings  screen. You should not adjust these settings unless you are familiar with SEO best practices.
The best way to learn about these settings is to review the help documentation for the SEO General Settings screen.
XML Sitemap
The XML site map allows a search engines to read a list containing every page on your site. SearchFit can automatically an xml site map and robots.txt entries that adhere to the sitemaps.org protocol. This includes the ability to adjust the "priority" and "change frequency" value for each type of page on your site. The XML site map can be enabled on the SEO Tab | XML Sitemaps screen.
The SEO General Settings Screen

How to Enable Your XML Site map
- Go to the SEO Naming Rules tab | XML Sitemap
 screen.
Note: You should not adjust these settings unless you are familiar with SEO best practices.
- From the select box labeled Generate Sitemaps.org xml files, choose Yes.
- From the select box labeled Create robots.txt Custom Page, choose Yes. Note: This setting should be used with caution as it may conflict with any existing robots.txt file that you have created.
- The bottom half of the SiteMaps.org XML Sitemap settings give you the ability to adjust the Priority and Change Frequency per page type. These settings are preset for you according to our xml site map preferences. It is not required that you adjust these, however; you may do so if you wish.
- Click the Update( ) button at the bottom of the screen when done.
4. Create Custom Pages
Custom Pages are a type of page created by the system for those pages that are not contained within your Product catalog. Below are some guide lines for creating some common examples of Custom Pages including your Home Page, Contact Us page, and Site map.
To view and create your Custom Pages, you should navigate to the Custom Pages Screen:
- Click the Content Tab.
- Locate the Informational and Additional Pages section. Click the Custom Pages icon (
 ). You will be transferred to the Custom Pages Screen.
Create Your Home Page
A page named default.htm was added to your shopping cart when it was installed. Default.htm is your home page. You should see default.htm listed on the Custom Web Pages table of the Custom Pages screen. Here are some guide lines for modifying your default.htm:
- Click the Edit link corresponding to the default.htm Custom Page to open the Edit Custom Page form.
- The Custom Page form contains several fields and settings, allowing highly customizable document creation. Please see the help file for the Custom Pages screen for complete details.
- Adjust the content of the AUTO_GENERATED_HEADER field by adding a Title and Meta Tags.
- Add the content of your home page in HTML format to the AUTO_GENERATED_CONTENT field.
- Default.htm uses, by default, the Main CSS style sheet.
Create Your Contact Us Page
Your Contact Us page can be created by navigating to the Custom Pages screen and clicking the New Custom Pages link. Here are some guide lines for creating your Contact Us page:
- Give your Contact Us page a Web Page Name, Web Link Name and AUTO_GENERATED_HEADER (Title and Meta Tags).
- Add a list of your contact information plus the content of your choice in HTML format to the AUTO_GENERATED_CONTENT field.
- You may also add a Contact Form to the AUTO_GENERATED_CONTENT field. JavaScript and PHP documents can be created as Custom Pages in order to perform client side & server side validation on your form as well as perform some action with the data (like sending you an email). It is strongly recommended that you do not make a contact form unless you know how to make it extremely secure.
- Hint: To create a Custom Page that is a JavaScript or PHP file (and does not use the Main Template), just create a new Custom Page (with a .js or .php extension in the Web Page Name field) and select Only Page Without Template from the Action select box. Alternatively, you could upload JavaScript and PHP files using either the WebSite Files Storage screen or the Dynamic Files Storage screen.
Create Your Site Map
Your Site map can be created by navigating to the Custom Pages screen and clicking the New Custom Pages link. Here are some guide lines for creating your Site map:
- Give your Site map a Web Page Name, Web Link Name, and AUTO_GENERATED_HEADER (Title and Meta Tags).
- The system can create a site map for you automatically. Just add the system-specific keyword to the AUTO_GENERATED_CONTENT field in the location where you would like it to appear.
- Use the SEO General Settings screen to configure settings that affect your site map:
- Sitemap: popularity links: Include links to your other Users (from the same shopping cart) in your site map.
- Sitemap: products per page: Specify the number of products to be displayed per page. Pagination links are added automatically.
- Sitemap: include Brief Products: Specify whether you would like Brief Products to appear on the site map.
- Sitemap: include Product Images: Specify if images should be added to your site map as well as the image size.
- Sitemap: include Product Tabs: Product Tabs are additional pages that are generated for the link on the optional, tab-based interface displayed on your Detailed Product pages.
- Sitemap: custom links position: Specify if links to your Custom Pages should appear at the top or bottom of your site map.
An Example Site map Displaying Products
5. Create Your Product Catalog
From top to bottom, your Product Catalog consists of Category Types, Categories, Sub Categories (Optional), and Products.
An Example Product Catalog Display

Create Category Types
Category Types are the required, top level of your Product catalog structure. To create your Category Type(s):
- Click the Products tab in the Control Panel.

- Click the Category Types icon (
 ). You will be transferred to the Category Types screen.
- Click the New Category Type link. The New Category Type panel will appear. Enter the desired name for the new Category Type. Click the Continue button ( ). You will be transferred back to the Category Type screen and the Edit Category Type form for the Category Type you just created will be visible.
- The Edit Category Type form contains many fields. The only required field is Category Type Name, which you have already entered. We suggest that you enter information into the AUTO_GENERATED_HEADER field including the Title and Meta Tags. More information is available in the help files including an explanation of all settings on the Edit Category Type form.
- When finished entering information into the Edit Category Type form, scroll to the bottom of the form and click the Add button (
 ). Congratulations, you have just created your first Category Type!
- Repeat steps 3 through 5 as necessary if you wish to create additional Category Types.
An Example Category Types Table from the Control Panel
Create Categories
Categories are a required, second level of your Product catalog structure. To create your Categories:
- Click the Products tab in the Control Panel.
- Click the Categories icon (
 ). You will be transferred to the Categories screen.
- Structurally speaking, Categories are located within Category Types. Use the Category Type select box to choose the parent Category Type for the Categories you are about to create.
- Click the New Category link. The New Category panel will appear. Enter the desired name for the new Category. Click the Continue button ( ). You will be transferred back to the Category screen and the Edit Category form for the Category you just created will be visible.
- The Edit Category form contains many fields. The only required field is Category Name, which you have already entered. We suggest that you enter information into the AUTO_GENERATED_HEADER field including the Title and Meta Tags. More information is available in the help files including an explanation of all settings on the Edit Category form.
- When finished entering information into the Edit Category form, scroll to the bottom of the form and click the Add button ( ). Congratulations, you have just created your first Category!
- Repeat steps 3 through 5 as necessary if you wish to create additional Categories. Remember to use the Category Type select box to choose the correct parent Category Type before clicking the New Category link.
An Example Categories Table from the Control Panel
Create Sub Categories
Sub Categories are an optional third level of your Product catalog structure.
Hint: Sub Categories are actually Categories that have been assigned a parent Category. If you already know how to create a Category, then do it. Next, transform the Category into a Sub Category by switching the Sub Category Of Select Box on the Edit Category form to the name of the parent Category.
To create your Sub Categories:
- Click the Products tab in the Control Panel.
- Click the Categories icon ( ). You will be transferred to the Categories screen.
- Structurally speaking, Sub Categories are located within Categories, which are in turn located in Category Types. Use the Category Type select box to choose the parent Category Type for the Sub Categories you are about to create.
- Click the New Category link. The New Category panel will appear. Enter the desired name for the new Category. Click the Continue button ( ). You will be transferred back to the Category screen and the Edit Category form for the Category you just created will be visible.
- Choose the name of the desired parent Category from the Sub Category of select box. The only required field is Category Name, which you have already entered. We suggest that you enter information into the AUTO_GENERATED_HEADER field including the Title and Meta Tags. More information is available in the help files including an explanation of all settings on the Edit Category form.
- When finished entering information into the Edit Category form, scroll to the bottom of the form and click the Add button ( ). Congratulations, you have just created your first Sub Category!
- Repeat steps 3 through 5 as necessary if you wish to create additional Sub Categories. Remember to use the Category Type select box to choose the correct parent Category Type before clicking the New Category link.
Create Products
Products MUST have a parent Category or Sub Category. They cannot be stored directly in a Category Type. To create your Products:
- Click the Products tab in the Control Panel.
- Click the Products icon (
 ). You will be transferred to the Products screen.
- Choose New Product from the Select a Function select box. The New Product panel will appear. Use the New Product panel to select the desired parent Category Type and Category (or Sub Category) for the new product. Enter the desired Product Name. When finished, click Continue ( ). You will be transferred to the General Tab of the Edit Product form.
- Use the Edit Product form to enter all information related to the product, including images. Below is a brief description of each tab on the Edit Product form. Be sure to click the Edit button at the bottom of the screen before navigating to another tab or screen. Along the way, click the Test link to view how the product would be displayed within the default Product Template.
- General: Enter general Product info like name, price, SKU, sort number, web page name, etc.
- Descriptions: Enter brief and detailed descriptions.
- Images: Upload up to five different images per Product including tiny, thumbnail, small, big and large sizes.
- Options: Create Option Groups, Options, and configure Option Settings.
- Meta Tags: Add Title and Meta Tags.
- eProduct: If the product is an eProduct, then upload the associated file.
- Inventory: Enter the quantity in stock, minimum quantity that can be ordered, threshold notification level, etc
- Freight: If the product must ship via a freight service, then mark the product as a Freight Product.
- Related Products: Select the Products that should appear in the related products display on the Detailed Description page.
- Upsell Products: Select Upsell Products. Upsell products are presented to customers before they view the cart.
- Navigation Bar: Assign a Navigation Bar to the product and add content per tab. A Navigation Bar is a tabbed interface.
- Filter Values: Used with the Dynamic, Filterable Menu. Select the Filter Values that match the product.
- Manufacturer: Select the Manufacturer of the Product.
- Miscellaneous: Large group of miscellaneous Product settings including flat shipping fee assignment, eGift Certificate/Cart assignment, Apply Taxes, Apply Discounts, Enable/Disable Ordering, 9 Additional Properties/fields of information and more.
- Generation Info: A record of when the product was Generated last. Nothing can be entered here.
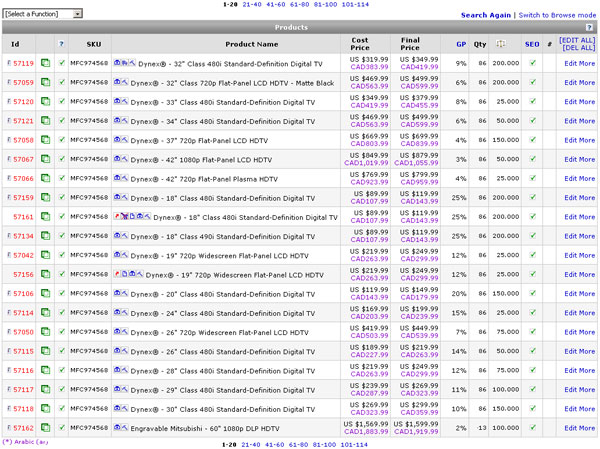
An Example Products Table from the Control Panel
6. Add Shipping Methods & Details
Add Shipping Methods
Creating a Shipping Method is the first step in configuring the types of shipping your customers can select from the Shipping Method select box on your checkout page. One or more Shipping Methods can be offered to your customers upon checkout. To create a Shipping Method:
- Click the Settings tab.

- Scroll down to the Shipping Settings section of the Settings screen. Click the Shipping Methods icon (
 ). You will be transferred to the Shipping and Other Methods screen.
- Click the New Method link. The New Method panel will appear.
- Select the Shipping Method for the Method Type and enter the desired Method Name. Click the Continue button ( ) when finished. You will be transferred to the Edit Shipping and Other Methods form.
- Select the desired setting from the Applicable Country select box.
- If you would like to add additional weight per order to your shipping calculation, then enter that amount in the Adjust Weight field.
- Enter the description of the Shipping Method that is viewable by customers in the corresponding field.
- Select the Calculation Method. The types of calculation methods include:
- Order Amount [Custom]: Shipping Cost will be based on order amount according to the ranges you specify.
- Order Weight [Custom]: Shipping Cost will be based on order weight according to the ranges you specify.
- External [Custom]: Shipping Cost will be calculated using a custom made script that interacts with the SearchFit API. This is useful when shipping cost is dependent on more than one custom criterion.
- Order Weight [FedEx]: Shipping Cost will be calculated using the FedEX shipping cost calculator.
- Order Weight [UPS]: Shipping Cost will be calculated using the UPS shipping cost calculator.
- Order Weight [USPS]: Shipping Cost will be calculated using the USPS shipping cost calculator.
- When finished adjusting settings, click the Add button ( ). Your Shipping Method has been created.
- You may have multiple Shipping Methods. Repeat steps 3-9 to create additional Shipping Methods as desired.
Add Shipping Details
Adding Shipping Details is a necessary, second step involved in offering shipping to your customers. Each of the Shipping Methods (mentioned in step 8 above) has a different group of settings that affect the final price of shipment. To create shipping details:
- Click the Settings tab.
- Scroll down to the Shipping Settings section of the Settings screen. Click the Shipping Details icon (
 ). You will be transferred to the Shipping and Other Fees screen.
- Select a Shipping Method from the Method select box. Only the Shipping Methods that you have already created will be displayed in the Method select box. A different form will appear depending on the type of method you select:
- If you select a Shipping Method that uses the Order Amount [Custom] or Order Weight [Custom] calculation method, then you will be presented with a table where ranges by weight or order amount can be entered and a matching shipping cost for each. Enter ranges by clicking the New Shipping Fee link.
- If you select a Shipping Method that uses the External Custom calculation method, then a form will be displayed where you should enter the server url (url of the custom shipping script) and server timeout in seconds.
- If you select a Shipping Method that uses the Order Weight [FedEx], Order Weight [UPS], or Order Weight[USPS], then a form will be displayed with a large number of settings related to the service types, packaging dimensions and account information for the given shipping company. At the bottom of the page, there is a form that allows you to test the real time estimation of your shipping fee.
- When finished adjusting settings, click the Update button ( ).
- Repeat steps 3 & 4 until you have adjusted the settings for each of your Shipping Methods.
7. Add Credit Card Processors and Other Payment Methods
The settings you enter on the Credit Card Processors and Other Payment Methods screen determine what is available to your customers in the Payment Methods section of your checkout page. You may enable only one Credit Card Processor. You may enable one or more Other Payment Method.
Add a Credit Card Processor
Although adding a Credit Card Processor is a great idea, it is not required. Instead, you could add an Other Payment Method (see next section). A Credit Card Processor uses information provided by your customers to charge their credit card and deposit the funds into your merchant account. The shopping cart is integrated with many different credit card processors including:
- authorize.net
- bankofamerica.com
- Borgun.is SecurePay
- cybersource.com
- ecs-world.com
- korta.is
- linkpoint.com
- innovativegateway.com
- internetsecure.com
- moneris.com
- NetBanx.com
- NOVA viaklix.com
- Ogone Advanced e-Commerce
- paradata.com
- paymentech.com
- paymentech: smwp.com
- PayPal.com (PayPal Pro)
- PayPal.com (Payflow Pro)
- PayTrace.com
- plugnpay.com
- QuickBooks Merchant Services
- SearchFit Merchant Services
- Sykes.com
- verisign.com
- worldpay
To add your existing Credit Card Processor with your shopping cart Control Panel, you should do the following:
- Click the Settings tab.
- Scroll down to the Payment Settings section. Click the Credit Card Processors icon (
 ). You will be transferred to the Credit Card Processors screen.
- Select the desired Credit Card Processor from the select box labeled The Selected Credit Card processor for user [X] is.... The Edit Credit Card Processor form will appear. The fields displayed on the Edit Credit Card Processor form vary depending upon the Credit Card Processor you have selected.
- Turn on the Help by clicking the Help icon (
 ) in the upper right corner of the Control Panel. A different set of instructions is available for each of the Credit Card Processors. It is strongly recommended that you compare the instructions provided in the Help with the documentation provided by your Credit Card Processor. You may also need to adjust the settings of the online control panel provided by your Credit Card Processor. Enter the data requested and adjust settings as needed on the Edit Credit Card Processor form. If you are not comfortable doing this yourself, we can provide this to you as a service.
- When you have completed the Edit Credit Card Processor form, click the Update button ( ).
Add an Other Payment Method
- Although adding an Other Payment Method is recommended, it is not required. Instead, you could add a Credit Card Processor (see previous section). The most popular types of Other Payment Methods are Google Checkout and PayPal Express. All types of Other Payment Methods include:
- Google Checkout
- PayPal Express
- PayPal Standard
- Money Order
- Check
- By Phone
- Offline
- Nothing to Pay (Specify what information the customer must enter if the order total is zero due to coupons and discounts.)
- Customize 1 (Make up your own payment method.)
- Customize 2
To add an Other Payment Method:
- Click the Settings tab.
- Scroll down to the Payment Settings section. Click the Other Payment Methods icon (
 ). You will be transferred to the Other Payment Methods screen.
- Select the desired Other Payment Method from the Payment Method select box. The Edit Other Payment Method form will appear. The fields displayed on the Edit Other Payment Method form vary depending upon the Other Payment Method you have selected.
- Turn on the Help by clicking the Help icon ( ) in the upper right corner of the Control Panel. A different set of instructions is available for each of the Other Payment Methods. Follow the instructions to configure your Other Payment Method(s).
- Click the Update button ( ).
- You may add multiple Other Payment Methods. Repeat steps 3-5 as desired to create additional Other Payment Methods.
Add Credit Card Types
You must use the Credit Cards Types screen to select the Credit Card Types(s) that your customers will be able to upon checkout. To add Credit Card Types:
- Click the Settings tab.
- Scroll down to the Payment Settings section. Click the Credit Card Types icon (
 ). You will be transferred to the Credit Card Types screen.
- Click the New Credit Card Type link. The New Credit Card Type panel will appear.
- Select the type of credit card you would like to add and click the Continue button ( ). You will be transferred back to the Credit Card Types screen.
- Repeat steps 3 & 4 to add additional Credit Card Types as desired.
- When finished adding Credit Card Types, click the Recreate Credit Cards Icon link. This will add an image displaying the appropriate Credit Card Types to your checkout page.
8. Configure Taxes Settings
Use the Sales Taxes screen to set the amount of tax to apply to orders on a state by state or by country basis. Also, the Configure Per User screen contains settings that affect your sales tax calculation.
To Create Taxes By State and/or Country:
- Click the Settings Tab.
- Scroll down to the Taxes Settings section. Click the Sales Taxes icon (
 ). You will be transferred to the Taxes by State/Province Screen.
- Click the New Sales Tax link. The New Sales Tax panel will appear.
- Select the Tax Type that you would like to apply. Choices are Country or State/Province. Click the Continue button ( ). You will be transferred to the Taxes form.
- Select the State or Country (depends on the Tax Type) to which you would like to apply the tax. Enter the tax percentage in the Tax % column.
- When finished click the Update Button ( ).
- Repeat steps 3-6 to create additional Sales Taxes as desired.
To Configure Additional Taxes Settings:
- Click the Settings Tab.
- Locate the Store Settings section. Click the Configure Per User icon (
 ). You will be transferred to the Configure Per User Screen .
- At the top of the Configure Per User Screen, there is a row of tabs. Click the Orders tab (
 ). The Orders tab content will appear.
- Within the Orders tab content, locate the setting for Taxable S&H. You may select YES or NO. This setting determines if Sales Tax will be applied to shipping cost.
- Locate the setting for Sales Tax Based On. You may select Shipping Address or Billing Address. This setting determines if the Sales Tax is based on the customer's entered shipping or billing address.
9. Configure Currency Settings
The default Currency Setting is US Dollars. If you accept US Dollars, then no setting adjustments are needed and you may skip this section. If you are selling your product in a different currency, you must still enter a price per product in US dollars. Use the Currencies screen to enable a Currency and specify its Conversion Rate compared to the US Dollar. The Conversion Rate you enter will be used to calculate the price of the Product in the desired Currency as displayed on your website. To configure your Currency Settings:
- Click the Settings tab.
- Locate the Store Settings section. Click the Currencies icon (
 ). You will be transferred to the Currencies screen.
- Click the New Currency link. The New Currency panel will appear.
- Enter the Currency name and click the Continue button ( ). You will be transferred to the Edit Currencies form.
- On the Edit Currencies form enter the Exchange Rate Toward 1 US Dollar. Enter a Prefix and/or Suffix consisting of the Currency symbol as it should appear on your website. Select the number of Digits After Decimal Point. If the Currency you are creating is US Dollars, click the Is US$ checkbox.
- When finished, click the Save button (
 ). Repeat steps 3-5 to create additional Currencies as desired. Only one Currency can be used per User.
- You must assign a Currency to the User representing the store where you intend to use the given currency. To assign a Currency to a User:
- Click the Settings tab.
- Locate the Store Settings section. Click the Users icon (
 ). You will be transferred to the Users screen.
- The Users screen displays a table listing all Users. Click the Edit link corresponding to the User that you would like to assign a Currency to. The Edit User form will appear.
- Locate the Store Configuration section of the Edit User form. Use the Currency select box to choose the Currency you would like to assign to the User.
- When finished, click the Save button ( ).
10. View and Process Your Orders
- A brief listing of your last 5 orders is displayed on your Control Panel Home page. A complete listing of your order data can be viewed on the Orders screen.
- Navigate to the Orders screen by clicking the Orders button (
 ), which is the second button from the left beneath the system logo.
- Click the View link next to an order to access the Detailed Order Information screen for that order.
- The Detailed Order Information screen displays the following information:
- List of Products sold for the Order including link to product displays.
- Price, Quantity and Total Cost per Item.
- Order Totals, including Sub Total, Charged Total, Weight Total
- Payment Method Used
- Shipping Information including the Name, Phone, Address, etc of the person receiving the order.
- Billing Information including the Name, Phone, Payment Information, etc of the person paying for the order.
- Additional Information & Instructions as entered by the customer on step 2 of the checkout process.
- Internal Information of the order including visitor data, transaction details and referrer link.
- Additional Properties including Progress History field, Internal Notes field, Paid Status, Charged Total, Authorized Status and Shipping Status.
- Additional Functions including function to send Order Receipt Emails to the recipient(s) of your choice including Customers, Administrators, Vendors.
- The Orders Table Contains the Following Columns:
- User: The name of the user/website that processed the order.
- Order #
- Date/Time (the order was processed).
- Customer (name)
- Country & State
- Amount
- Paid Status: Possible values include:
- Paid (funds collected)
- Authorized, but not Paid (funds not collected)
- Not Paid (funds not collected)
- Order Status: Possible values include:
- New (not finished)
 : This row will indicate the numeric and monetary value of orders of status type New (not finished). Orders of this type would include new orders that have not yet been finalized.
- New
 : This row will indicate the numeric and monetary value of orders of status type New. Orders of this type would include new orders that have been finalized but have not yet begun to be processed.
- In Progress
 : This row will indicate the numeric and monetary value of orders of status type In Progress. Orders of this type would include new orders that are in processing.
- Approved
 : This row will indicate the numeric and monetary value of orders of status type Approved. Orders of this type would include new orders that have been processed and for which payment has been approved.
- On Backorder
 : This row will indicate the numeric and monetary value of orders of status type On Backorder. Orders of this type would include new orders that have not yet been processed due to an inventory shortage of requested product(s).
- Incomplete (on hold)
 : This row will indicate the numeric and monetary value of orders of status type Incomplete (on hold). Orders of this type would include new orders that have not yet been processed due to a lack of information and are generally expecting future completion.
- Partially Shipped
 : This row will indicate the numeric and monetary value of orders of status type Partially Shipped. Orders of this type would include orders that have been processed but that include items being shipped separately. However, an order with separate shipments will only be of this type if it also still contains items that have not yet shipped.
- In Transit
 : This row will indicate the numeric and monetary value of orders of status type In Transit. Orders of this type would include new orders that have been processed and that are currently being shipped to the order's recipient.
- Follow Up: This row will indicate the numeric and monetary value of orders of status type Follow Up. Orders of this type would include orders that the store's operator wishes to check on. An order is generally designated of this type when the store operator wants to follow up with the customer or the item's supplier regarding the request.
- Ready for Shipment
 : This row will indicate the numeric and monetary value of orders of status type Ready for Shipment. Orders of this type would include new orders that have been processed and are currently awaiting shipment.
- Done (shipped)
 : This row will indicate the numeric and monetary value of orders of status type Done (shipped). Orders of this type would include all orders that are regarded as complete.
- Refunded
 : This row will indicate the numeric and monetary value of orders of status type Refunded. Orders of this type would include orders that were processed but whose charges were subsequently reversed.
- Bad (denied)
 : This row will indicate the numeric and monetary value of orders of status type Bad (denied). Orders of this type would include new orders that were rejected by the payment processor.
- Cancelled
 : This row will indicate the numeric and monetary value of orders of status type Cancelled. Orders of this type are not intended to be filled.